

An open-source web interface to easily and efficiently control CNC laser machines.
A Progressive Web App (PWA) to control CNC or laser machines using the Web Serial API
Draw, process images, generate G-code, and communicate with controllers and full offline support
⚠ Optimized for Google Chrome in Dark Mode
HobbyLASER is aimed at users of CNC machines, engravers, and plotters—particularly self-built or budget models. It was developed to fill the gap between the basic software offered by low-cost machine manufacturers and professional software solutions, with a focus on hobby use and rapid prototyping.
Simple but not trivial, it uses a hybrid system of tools and scripts to create and transform vector drawings, process images, and generate files ready to be sent to microcontrollers. HobbyLASER requires no installation, as it runs entirely in the browser—no dependencies, no drivers—using the Web Serial API for USB communication.
It should be considered a constant work in progress, but thanks to its nature as a Progressive Web App (PWA), updates are available immediately upon release.
Currently, it can import text-based files with the following extensions: .svg, .dxf, .gcode, .nc, and raster images in .png, .jpg, or .jpeg format. The .svg format is an open standard, but only single-path drawings using absolute commands are accepted. For example, a file exported from Inkscape will be rejected if it contains multiple paths, groups, or uses relative commands.
HobbyLASER is a free and open-source project developed with passion for hobbyists and makers. If you find it useful and would like to support its continued development, you can make a small donation. Every contribution helps improve features, fix bugs, and keep the project alive.

ℹ GRBL is an open-source firmware for CNC motion control using Arduino-based boards. Learn more
⚠ Make sure your firmware accepts serial commands via USB.
Default baud rate:
115200
git clone https://github.com/marco-f/PWA-HobbyLASER.git
cd PWA-HobbyLASER
npm install -g http-server
http-server
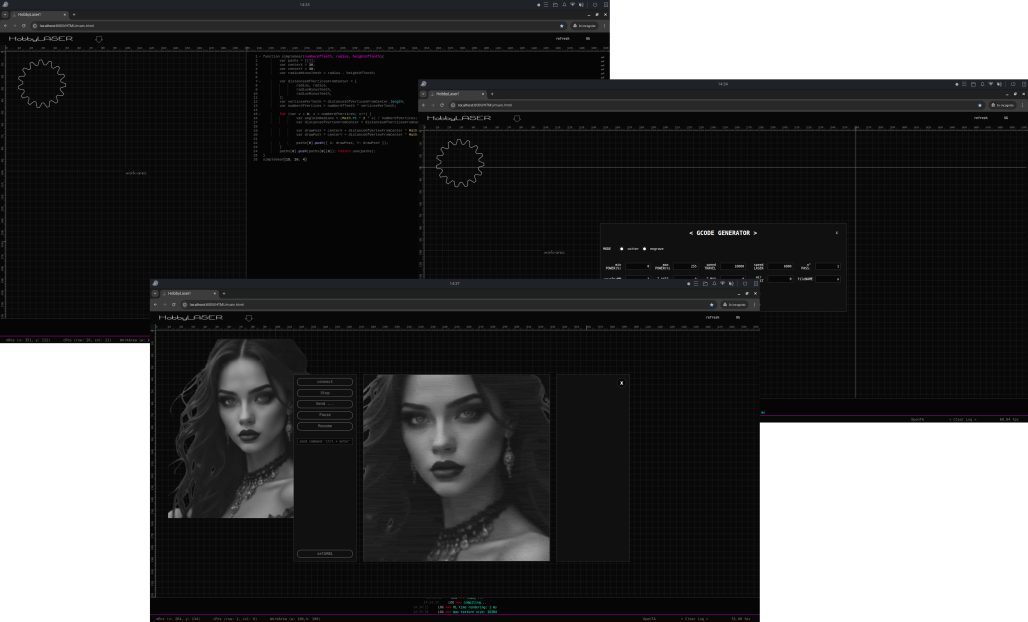
Below is a screenshot of the interface in action. It shows the drawing tools, image processing options, and G-code preview – all in the browser.
Di seguito una schermata dell'interfaccia in azione. Mostra gli strumenti di disegno, le opzioni di elaborazione immagini e l'anteprima del G-code – tutto nel browser.
The user interface is divided into five key areas, designed to deliver maximum precision and control in a single environment.
L’interfaccia utente si articola in cinque aree chiave, studiate per offrire massima precisione e controllo in un unico ambiente.
Rulers graduated in millimeters run along the top and left edges of the workspace for quick measurements and accurate element placement.
Ai bordi superiore e sinistro dell’area di lavoro scorrono righelli graduati in millimetri, per misurazioni rapide e posizionamenti accurati di ogni elemento grafico.
A customizable grid (adjustable spacing and line weight) is visible in the workspace background, supporting “snap-to-grid” to facilitate alignment and scaling of objects.
Sullo sfondo dell’area di lavoro è visibile una griglia personalizzabile (passo e spessore regolabili) che supporta lo “snap-to-grid”, facilitando l’allineamento e il ridimensionamento degli oggetti.
Guides can be instantiated by clicking the intersection point of the horizontal and vertical rulers. Once generated, they become dynamically adjustable by dragging from their intersection node—an essential feature for defining precise custom axes and reference grids, particularly in complex layout compositions or for segmenting the workspace into functional zones.
Le guide possono essere generate facendo clic sul punto di intersezione tra i righelli orizzontale e verticale. Una volta create, risultano regolabili dinamicamente trascinando il nodo di intersezione—una funzione essenziale per definire assi personalizzati e griglie di riferimento precise, particolarmente utile in composizioni di layout complesse o per suddividere l’area di lavoro in zone funzionali.
The blank area originates at coordinate 0/0 and can be dynamically resized by dragging the handle located at the intersection of the rulers. The updated dimensions are automatically transmitted to the GRBL controller, ensuring precise alignment between the digital workspace and the physical machine coordinates.
L'area vuota ha origine nella coordinata 0/0 ed è ridimensionabile dinamicamente trascinando la maniglia posta all'intersezione dei righelli. Le dimensioni aggiornate vengono trasmesse automaticamente al controllore GRBL, garantendo un allineamento preciso tra l’area di lavoro digitale e le coordinate macchina reali.
Dedicated space for real-time visualization of the toolpath and job simulation. Accurately reflects transformations, material boundaries, and machine behavior during execution.
Spazio dedicato alla visualizzazione in tempo reale del percorso utensile e alla simulazione del lavoro. Rappresenta con precisione trasformazioni, limiti del materiale e comportamento macchina durante l'esecuzione.
With simple keyboard shortcuts you can quickly create regular polygons, text, ellipses, rectangles, or start the polyline drawing tool.
Con semplici combinazioni da tastiera si creano rapidamente poligoni regolari, testi e ellissi e rettangoli, oppure si avvia lo strumento di disegno polyline.
Through scripting (JavaScript), by invoking API functions, you can apply complex transformations (translation, scaling, skew, offset, ...) to objects or combine them with boolean operations (union, difference, intersection, XOR) programmatically.
A mezzo scripting (JavaScript) possiamo, richiamando funzioni API, applicare agli oggetti trasformazioni complesse (traslazione, scalatura, skew, offset, ...) o combinarli con operazioni booleane (union, difference, intersection, XOR) in modo programmatico.
A dedicated panel displays real-time status messages, errors, and confirmations, each line timestamped for immediate debugging and comprehensive operation tracking.
Pannello dedicato alla visualizzazione in tempo reale di messaggi di stato, errori e conferme, ogni riga corredata di timestamp per un debug immediato e completo tracciamento delle operazioni.
Import PNG/JPG directly onto the canvas and adjust size, gamma, position, rotation, flip, and via script apply filters (dithering, halftone) or cropping.
Importare PNG/JPG direttamente nel canvas e regolare misura, gamma, posizione, rotazione, flip e da script applicare filtri (dithering, halftone) o ritaglio.
Start bitmap-to-vector conversion (using potrace.js), obtaining SVG paths that can then be treated like normal vector objects (resized, transformed, or combined with boolean operations).
Avviare la conversione bitmap→vettoriale (tramite potrace.js), ottenendo tracciati SVG che possono poi essere trattati come normali oggetti vettoriali (ridimensionati, trasformati, o combinati con operazioni booleane).
After creating or manipulating the path with the .gcode() function, you can access the section dedicated to generating, previewing, and sending the G-code to your machine.
Dopo aver creato o manipolato il tracciato con la funzione .gcode(), si può accedere alla sezione dedicata alla generazione, visualizzazione e invio del G-code alla macchina.
Use this modal to configure all the parameters for cutting or engraving: set minimum and maximum laser power, travel and engraving speeds, number of passes, and more. Click ‘Create’ to generate the G‑code preview or choose ‘Download’ to save the file directly.
Usa questa finestra per configurare tutti i parametri di taglio o incisione: imposta potenza minima e massima del laser, velocità di viaggio e incisione, numero di passate e altro. Clicca ‘Create’ per generare l’anteprima del G‑code o ‘Download’ per salvare il file.
In this modal you can preview the generated G‑code in a 3D simulator and manage your machine connection via GRBL. Use the buttons to connect/disconnect, send the G‑code line by line, pause, resume or stop the job at any time.
In questa finestra puoi visualizzare il G‑code generato in un simulatore 3D e gestire la connessione alla macchina tramite GRBL. Usa i pulsanti per connetterti/disconnetterti, inviare il G‑code riga per riga, mettere in pausa, riprendere o arrestare il lavoro in qualsiasi momento.
Ctrl + Delete |
|
Ctrl + I |
|
Ctrl + + |
|
Ctrl + - |
|
Ctrl + R |
|
Ctrl + M |
|
Ctrl + G |
.png,.jpg,.jpeg.svg.dxf.gcode,.nc
Alt + A |
|
Alt + S |
|
Alt + D |
POLYLINE(PV['p_<n>'])shift + e |
|
shift +c |
|
shift + u |
|
shift + r |
|
shift + a |
|
shift + d |
|
shift + q |
// Create a 6-sided hexagon of radius 100
POLYGON(10, 50, 50, 30)
// Render “Hello” at position (100, 200) with font size 48
TEXT('roboto_b', 48, 30, 30, 'hello')
var t = TEXT('roboto_b', 36, 25, 35, 'hi')
var circ = POLYGON(32, 40, 40, 40)
difference(circ, t)
translate(dx, dy) |
|
rotate(angle) |
|
scale(sx, sy) |
|
mirror(axis) |
|
skew(axis, angle) |
|
offset(dist) |
|
tab(size, n) |
union(pathA, pathB, ...) |
|
intersection(pathA, pathB) |
|
difference(pathA, pathB) |
|
xor(pathA, pathB) |
|
center(pathA, pathB) |
// Draw two overlapping circles, then subtract one from the other
var a = POLYGON(20, 30, 30, 20)
var b = POLYGON(8, 50, 50, 20)
union(a,b)
// Import a 200 (preserve aspect ratio) image at position (50, 50)
IMAGE(size=200, gamma=0, x=50, y=50, rot=0, flip='')
img.vector(level) |
|
img.dit(method) |
|
img.half(method) |
|
img.cutter() |
IMAGE(size=100, gamma=0, x=10, y=10, rot=0, flip='').dit()
// Trace at 40 threshold

IMAGE(size=100, gamma=0, x=10, y=10, rot=0, flip='').vector(40)
TRACE(img, threshold):
// Full workflow

IMAGE(200, 0, 0, 0, '').vector(40).gcode()
| Shortcut Scorciatoia |
Action Azione |
Example Esempio |
|---|---|---|
| Ctrl + ↑ ↓ ← → | Ctrl + ↑ |
|
| Ctrl + Shift + ↑ ↓ ← → | Ctrl + Shift + → |
|
| Ctrl + PageUp / PageDown | Ctrl + PageDown |
|
| Ctrl + Shift + PageUp / PageDown | Ctrl + Shift + PageUp |
|
| Shift + F / G / R | Shift + G |
|
| Shift + S / D / X | Shift + D |
|
| Shift + Z / A / Q | Shift + A |
|
| Ctrl + Alt + F + [0–9] | Ctrl + Alt + F + 5 |
|
| Ctrl + Alt + D + [0–9] | Ctrl + Alt + D + 2 |
|
| Ctrl + Alt + X + [0–9] | Ctrl + Alt + X + 8 → 800 |
|
| Ctrl + Alt + Z + [0–9] | Ctrl + Alt + Z + 4 → 400 |
|
| Ctrl + Esc | Ctrl + Esc |
The most direct way to try the app is by clicking the DEMO button or accessing the GitHub Live version. However, for the best experience, we recommend installing it as a Progressive Web App (PWA) on your device.
Il modo più diretto per provare l’app è cliccando sul pulsante DEMO oppure accedendo alla versione Live ospitata su GitHub. Tuttavia, per un’esperienza ottimale, si consiglia di installarla come Progressive Web App (PWA) sul proprio dispositivo.
The project is open source and available on GitHub. Take a look, suggest improvements or contribute!
Go to Repository
HobbyLASER is not affiliated with any specific hardware
For support requests, feature suggestions, please use the GitHub Discussions
Only if you’ve found a software bug, open a bug report in the GitHub Issues